Declaring a Page
To declare a page, annotate any subclass of Widget with the @Page annotation:
@Page
public class ItemListPage extends Composite {
  // Anything goes...
}
By default, the name of a page is the simple name of the class that declares it. In the above example, the ItemListPage will fill the navigation panel whenever the browser's location bar ends with #ItemListPage. If you prefer a different page name, use the @Page annotation's path attribute:
@Page(path="items")
public class ItemListPage extends Composite {
  // Anything goes...
}
Navigation and Errai UI
Any widget can be a page. This includes Errai UI @Templated classes! Simply annotate any Errai UI templated class with @Page, and it will become a page that can be navigated to.
The Starting Page
Each application must have exactly one starting page. This requirement is enforced at compile time. The starting page is displayed when there is no fragment ID present in the browser's location bar.
Use the startingPage attribute to declare the starting page, like this:
@Page(startingPage=true)
public class WelcomePage extends Composite {
  // Anything goes...
}
Pages are looked up as CDI beans, so you can inject other CDI beans into fields or a constructor. Pages can also have @PostConstruct and @PreDestroy CDI methods.
Page Lifecycle
There are four annotations related to page lifecycle events: @PageShowing, @PageShown, @PageHiding, and @PageHidden. These annotations designate methods so a page widget can be notified when it is displayed or hidden:
@Page
public class ItemPage extends VerticalPanel {

  @PageShowing
  private void preparePage() {
  }

  @PageHiding
  private void unpreparePage() {
  }

  // Anything goes...
}
Page Lifecycle:
-
The fragment identifier in the URL changes
-
The @PageHiding method on the current (about-to-be-navigated-away-from) page is invoked
-
The current page is removed from the browser's DOM
-
The @PageHidden method on the just-removed page is invoked
-
The navigation system looks up the corresponding @Page bean in the client-side bean manager (we'll call this bean "the new page")
-
The navigation system writes to all @PageState fields in the new page bean (more on this in the next section)
-
The @PageShowing method of the new page is invoked
-
The new page widget is added to the DOM (as a direct child of the navigation content panel)
-
The @PageShown method of the new page is invoked.
The @PageShowing and @PageShown methods are permitted one optional parameter of type HistoryToken---more on this in the next section.
The lifespan of a Page instance is governed by CDI scope: Dependent and implict-scoped page beans are instantiated each time the user navigates to them, whereas Singleton and ApplicationScoped beans are created only once over the lifetime of the application. If a particular page is slow to appear because its UI takes a lot of effort to build, try marking it as a singleton.
Page State Parameters
A page widget will often represent a view on on instance of a class of things. For example, there might be an ItemPage that displays a particular item available at a store. In cases like this, it's important that the bookmarkable navigation URL includes not only the name of the page but also an identifier for the particular item being displayed.
This is where page state parameters come in. Consider the following page widget:
@Page
public class ItemPage extends VerticalPanel {

  @PageState
  private int itemId;

  // Anything goes...
}
This page would be reachable at a URL like http://www.company.com/store/#ItemPage;itemId=4. Before the page was displayed, the Errai UI Navigation framework would write the int value 4 into the itemId field.
There are three ways to pass state information to a page: by passing a Multimap to TransitionTo.go(); by passing a Multimap to Navigation.goTo(), or by including the state information in the fragment identifier of a hyperlink as illustrated in the previous paragraph (use the HistoryToken class to construct such a fragment ID properly.)
A page widget can have any number of @PageState fields. The fields can be of any primitive or boxed primitive type (except char or Character), String, or a Collection, List, or Set of the allowable scalar types. Nested collections are not supported.
@PageState fields can be private, protected, default access, or public. They are always updated by direct field access; never via a setter method. The updates occur just before the @PageShowing method is invoked.
In addition to receiving page state information via direct writes to @PageState fields, you can also receive the whole Multimap in the @PageShowing and @PageShown methods through a parameter of type HistoryToken. Whether or not a lifecycle method has such a parameter, the @PageState fields will still be written as usual.
Page state values are represented in the URL much like HTML form parameters: as key=value pairs separated by the ampersand (&) character. Multi-valued page state fields are represented by repeated occurrences of the same key. If a key corresponding to a @PageState field is absent from the state information passed to the page, the framework writes a default value: null for scalar Object fields, the JVM default (0 or false) for primitives, and an empty collection for collection-valued fields. To construct and parse state tokens programmatically, use the HistoryToken class.
Declaring a Link with TransitionAnchor
The easiest way to declare a link between pages is to inject an instance of TransitionAnchor<P>, where P is the class of the target page.
Here is an example declaring an anchor link from the templated welcome page to the item list page. The first code sample would go in WelcomePage.java while the second would go in the WelcomePage.html, the associated html template.
@Page(startingPage=true)
@Templated
public class WelcomePage extends Composite {

  @Inject @DataField TransitionAnchor<ItemListPage> itemLink;

}
<div>
  <a data-field="itemLink">Go to Item List Page</a>
</div>
You can inject any number of links into a page. The only restriction is that the target of the link must be a Widget type that is annotated with @Page. When the user clicks the link Errai will transition to the item list page.
Declaring a Manual Link
Sometimes it is necessary to manually transition between pages (such as in response to an event being fired). To declare a manual link from one page to another, inject an instance of TransitionTo<P>, where P is the class of the target page.
This code declares a manual transition from the welcome page to the item list page:
@Page(startingPage=true)
public class WelcomePage extends Composite {

  @Inject TransitionTo<ItemListPage> startButtonClicked;

}
You do not need to implement the TransitionTo interface yourself; the framework creates the appropriate instance for you.
As with TransitionAnchor, the only restriction is that the target of the link must be a Widget type that is annotated with @Page.
Installing the Navigation Panel into the User Interface
Beginning in version 2.4, Errai will automatically attach the Navigation Panel to the Root Panel, but it is possible to override this behaviour by simply adding the Navigation Panel to another component manually. The best time to do this is during application startup, for example in the @PostConstruct method of your @EntryPoint class. By using the default behaviour you can allow Errai Navigation to control the full contents of the page, or you can opt to keep some parts of the page (headers, footers, and sidebars, for example) away from Errai Navigation by choosing an alternate location for the Navigation Panel.
The following example reserves space for header and footer content that is not affected by the navigation system:
@EntryPoint
public class Bootstrap {

  @Inject
  private Navigation navigation;

  @PostConstruct
  public void clientMain() {
    VerticalPanel vp = new VerticalPanel();
    vp.add(new HeaderWidget());
    vp.add(navigation.getContentPanel());
    vp.add(new FooterWidget());

    RootPanel.get().add(vp);
  }
}
This last example demonstrates a simple approach to defining the page structure with an Errai UI template. The final product is identical to the above example, but in this case the overall page structure is declared in an HTML template rather than being defined programmatically in procedural logic:
@Templated
@EntryPoint
public class OverallPageStrucutre extends Composite {

  @Inject
  private Navigation navigation;

  @Inject @DataField
  private HeaderWidget header;

  @Inject @DataField
  private SimplePanel content;

  @Inject @DataField
  private FooterWidget footer;

  @PostConstruct
  public void clientMain() {

    // give over the contents of this.content to the navigation panel
    content.add(navigation.getContentPanel());

    // add this whole templated widget to the root panel
    RootPanel.get().add(this);
  }

}
Viewing the Generated Navigation Graph
Because the pages and links in an Errai Navigation application are declared structurally, the framework gets a complete picture of the app's navigation structure at compile time. This knowledge is saved out during compilation (and at page reload when in Dev Mode) to the file .errai/navgraph.gv. You can view the navigation graph using any tool that understands the GraphViz (also known as DOT) file format.
One popular open source tool that can display GraphViz/DOT files is GraphViz. Free downloads are available for all major operating systems.
When rendered, a navigation graph looks like this:
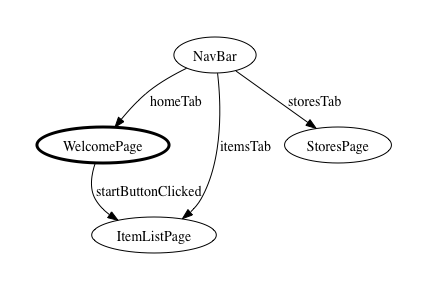
In the rendered graph, the pages are nodes (text surrounded by an ellipse). The starting page is drawn with a heavier stroke. The links are drawn as arrows from one page to another. The labels on these arrows come from the Java field names the TransitionTo objects were injected into.